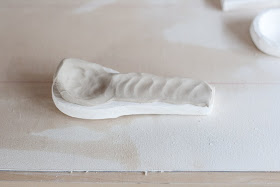
Its been in my head for a bit to make some spoons. Inspired by the amazing spoons of Julie Whitmore and Diana Fayt. Their spoons are truly works of art.
I have a small salt jar with a ceramic spoon that I purchased from Anthropologie (I know, I know) a couple of years ago. I love it. The little spoon is so sweet. Every time I use it, I swear that I will make my own spoons.
And finally, I did!

I made some bisque molds. I used the ceramic spoon mentioned above to get the general shape that I wanted.


These steps took a little trial and error. That first photo has WAY too much clay, but you get the idea. Take some clay, push it into the mold.


Clean up and refine. This was a little tricky. I expected the bisque mold to "hold" the clay, but it did not. It easily released the spoon. So it was a challenge to keep the spoon in the mold while I worked on cleaning the shape up.


I used mishima to decorate the spoons. A technique that I have been wanting to explore. And the small surface of the spoons was perfect.

Ta-da! Some finished spoons!

Those spoons are lovely! Thanks for the tutorial.
ReplyDeleteThanks Ron. They were fun to make. Already have the next batch planned and will be making a bigger mold, too.
ReplyDeleteWonderful work. I have been drooling over those spoons too! Thanks for sharing your technique. I would have never thought to use a mold. Have you seen Kristen Pavelkas little spoons? yummmm.
ReplyDeleteHi Cindy!
ReplyDeleteOh yes! Kristen Pavelkas are so great! Don't know how I forgot those. Her scoops were probably the first ones that I saw and truly fell in love with.
And checking her website just now, I see she has added some other utensils too:
http://www.pavelkapottery.com/index.html
Amazing! I love that you are always exploring some new work. Looks great. D
ReplyDeleteThese are so great! I've been wanting to make ceramic spoons for ages, but had no idea how to go about it. Have to try this, thanks so much!
ReplyDeleteAlso, the mishima decoration is just lovely:)
you are swell to share! can't wait to try them!
ReplyDeleteYour spoons are great, and you did a wonderful job with your mishima decoration! I have made some spoons but formed each one by hand. I'll have to try making a mold for some of them.
ReplyDeleteI went ahead and made some, plus featured your blog. Hope that's ok:) Thanks again for the inspiration!
ReplyDeletehttp://15paintedcups.blogspot.com/
ugh, jeanette. i read the blog last night before and i could hardly sleep because of these spoons! At the ungodly hour of 6 i considered going to the studio...i didn't though. they are so beautiful and i'm jealous.. miss you!
ReplyDeleteI've been thinking about making some spoons for some little condiment bowls I made and this is perfect! I found a little wooden spoon for the mold and I'll be firing the mold next week so I can use it. Thanks for posting this.
ReplyDeleteMight I ask how you glaze fired them? Did you suspend them or were they stilted? If stilted, how did you get rid of the prickly spots in the glaze?
ReplyDeleteHi tammy g!
ReplyDeleteI fire them on stilts. And use a sanding block to get rid of any sharp edges. Often there is still a small black mark from the stilts, but that doesn't bother me.
You can suspend them from rods in the kiln, too. I just prefer the stilt method.
This comment has been removed by a blog administrator.
ReplyDeleteThank you! I have tried my hand after looking at your work and that of Diana Fayt and Julie Whitmore, as you suggested. LOVE the little spoons and won't drink a cuppa tea without one now! Thank you.
ReplyDeleteFantastic tutorial!!
ReplyDeleteWhat cone are you firing at?
ReplyDeleteHi anonymous,
ReplyDeleteI fire to cone 7.
hi please tell me how you are glasing the spoons, do you hand them in the oven from something ??
ReplyDeleteWell, Duh..... I've been making little spoons "by hand" and no matter how much time I spend, they never look the same, and just take TOO much time to be "profitable". I am making a mold TOMORROW! Thanks for your inspiration!
ReplyDeleteLovely spoons. Many thanks for sharing the tutorial.
ReplyDeleteI notice you are using a wire loop either for hanging the spoons in the kiln, or to leave in. I would love to now what type of wire can be used for this, so that it does not melt at stoneware temperatures.
Cheers
Merilyn
Omg those spoon rests are so cute! Love the pears.
ReplyDeleteDid you use glaze?
ReplyDelete